

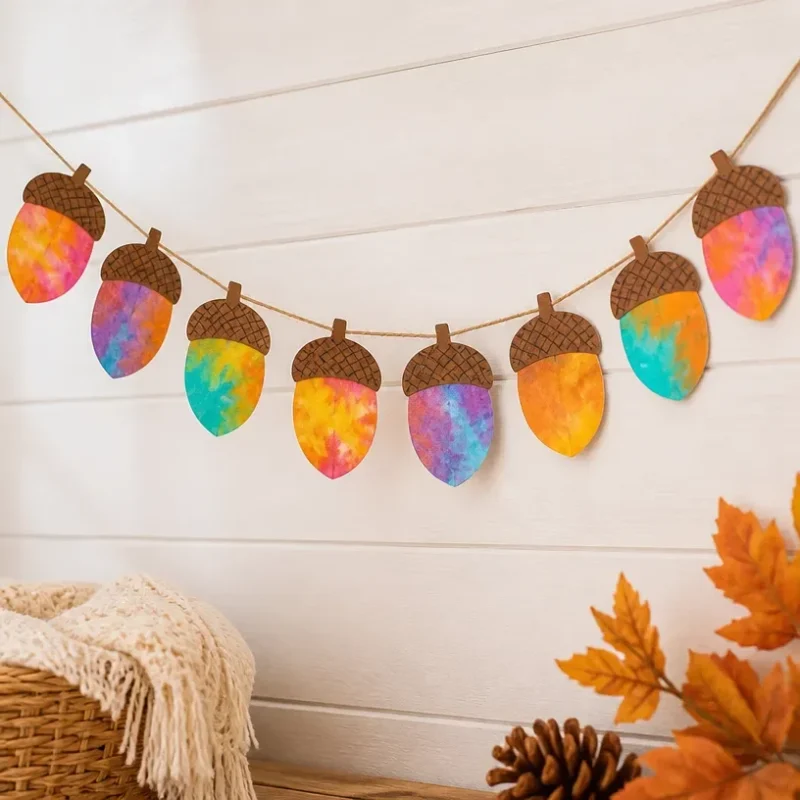
DIY Rainbow Coffee Filter Acorn Garland Tutorial
Creating a beautiful DIY Rainbow Coffee Filter Acorn Garland is a fun project that offers a colorful twist to traditional fall decorations. The finished garland combines vibrant hues and adorable acorn shapes, making it a lively addition to your home or classroom. Best of all, this project is approachable for crafters of all skill levels, using simple materials that transform in delightful ways. You may also find Rainbow Yarn Kitten Pom Pom Garland Diy useful.
<img src="

" alt="DIY Coffee Filter Acorn Garland" />
Materials You’ll Need
To create this eye-catching garland, gather the following materials: You may also find Watercolor Coffee Filter School Bus Garland useful.
- Coffee filters
- Brown construction paper
- Scissors
- Hot glue gun and glue sticks
- String or twine
- Watercolor markers in various colors
- Small bowl of water
- Paintbrush or spray bottle
- A piece of cardboard (optional, for shaping)
Choosing Your Materials
When selecting your materials, consider using quality coffee filters, as they absorb and hold color beautifully. For this project, watercolor markers or other vibrant colors will enhance the final product. Using a hot glue gun allows for strong adhesion, ensuring your acorns hold up during display.
How to Make DIY Rainbow Coffee Filter Acorn Garland
Follow these steps to create your stunning garland.
Step-by-Step Instructions
Prepare the Coffee Filters: Take several coffee filters and flatten them out. This will be the primary material for your acorns. You can achieve various sizes by adjusting how many filters you stack.
Color the Filters: Using your watercolor markers, color the top of the filters in different shades of your choice. You can create patterns or simply fill them in with colors. To achieve a more flowing color effect, lightly spray or brush water onto the filters, allowing the colors to blend beautifully.
Dry the Filters: Place the colored filters flat on a surface to dry completely. This should take about 15-30 minutes, depending on the amount of water used.
Shape the Filters: Once dried, stack 2-3 filters for each acorn, pinching the center to create a rounded shape. The filters can be trimmed to desired acorn shapes.
Create the Caps: Cut small circles from the brown construction paper. These will serve as the tops of your acorns. You can fringe the edges for a more textured look.
Assemble the Acorns: Use your hot glue gun to attach the brown paper cap to the top of the shaped filters. Ensure it adheres well.
String the Acorns: Cut a length of string or twine suitable for your garland. Once your acorns are assembled, simply thread them onto the string, spacing them as desired.
Hang and Display: Your rainbow acorn garland is now ready to be hung! Consider displaying it across a mantel, on a window, or along a stair railing.
Get inspired with other creative projects, like these coffee filter rainbow roses, that also utilize coffee filters in fun ways.
Helpful Tips
- To avoid messy hands while coloring, consider using gloves.
- Experiment with different water levels for varied color saturation.
- If you don’t have a hot glue gun, regular white glue may work, but it will require longer drying times.
Common Mistakes to Avoid
- Ensure the filters are completely dry before shaping; wet filters can tear easily.
- Be careful with the amount of water used when blending colors; too much can make the colors run excessively.
Ways to Customize It
Feel free to customize your garland in various ways! Consider adding glitter for extra sparkle or using themed colors for specific holidays or seasons. You might also choose to incorporate additional elements, such as pineapple shapes or other fall-themed decorations.
Crafting With Kids
This project is a great way to involve children in crafting! They will love the vibrant colors and the simple process of creating acorns. Ensure adult supervision when using scissors or hot glue, and encourage them to express their creativity with color choices.
Frequently Asked Questions
How do I store my garland after the season?
After the holiday season, gently store your garland in a cool, dry place. Avoid crushing the acorns to maintain their shape.
Can I use different types of coloring materials?
Absolutely! You can experiment with different materials like spray paints or food coloring if you’d like to change things up.
What other projects can I try with coffee filters?
If you enjoy this project, consider exploring coffee filter tie-dye flowers for a colorful addition to any space!
Conclusion
The DIY Rainbow Coffee Filter Acorn Garland is a delightful and simple craft that adds a burst of color to any autumn setting. It’s a perfect project to engage with the family while bringing creativity to your home. For additional craft ideas, check out these fun coffee filter crafts, and don’t forget to explore seasonal activities like those seen on this K-8 Curriculum Board forum. Happy crafting!
Print
DIY Rainbow Coffee Filter Acorn Garland
- Total Time: 30 minutes
- Makes: 1 garland
Description
Create a colorful DIY Rainbow Coffee Filter Acorn Garland, perfect for brightening up your fall decorations with this fun and easy craft project.
Materials
- Coffee filters
- Brown construction paper
- Scissors
- Hot glue gun and glue sticks
- String or twine
- Watercolor markers in various colors
- Small bowl of water
- Paintbrush or spray bottle
- A piece of cardboard (optional, for shaping)
Instructions
- Prepare the Coffee Filters: Take several coffee filters and flatten them out.
- Color the Filters: Using your watercolor markers, color the top of the filters in different shades.
- Dry the Filters: Place the colored filters flat on a surface to dry completely.
- Shape the Filters: Once dried, stack 2-3 filters for each acorn, pinching the center.
- Create the Caps: Cut small circles from the brown construction paper for your acorn tops.
- Assemble the Acorns: Use your hot glue gun to attach the brown paper cap to the top of the shaped filters.
- String the Acorns: Cut a length of string or twine and thread the assembled acorns onto it.
- Hang and Display: Your rainbow acorn garland is now ready to be hung! Consider displaying it across a mantel or along a stair railing.
Notes
To avoid messy hands while coloring, consider using gloves. Feel free to customize your garland with glitter for extra sparkle.