


Why You’ll Love This Project
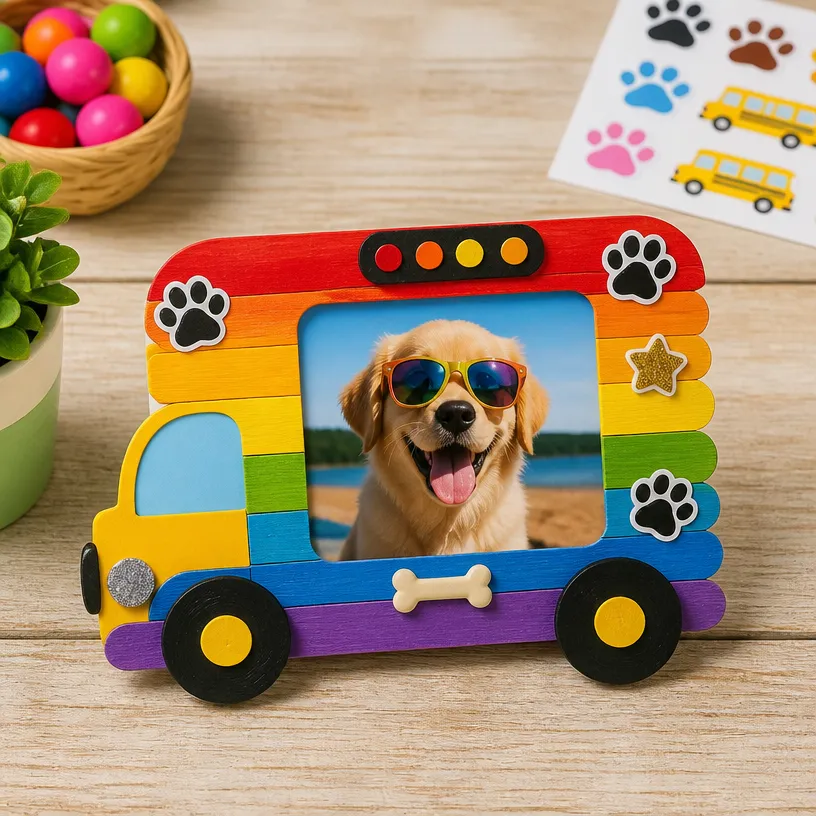
Get ready to craft a delightful Rainbow Puppy Photo Frame with a charming School Bus Design that is perfect for displaying your favorite memories. This project brings together bright colors, playful themes, and a hands-on making experience that families can enjoy together. The finished frame showcases the sweet essence of a rainbow puppy alongside the iconic imagery of a school bus, making it a wonderful addition to any room or a perfect gift for a young one in your life. Plus, the satisfaction of turning basic materials into something beautiful makes this project a rewarding experience. You may also find Rainbow Potion Jars With Glitter Swirl Decor useful.
Materials You’ll Need
Before diving into the creative process, gather these essential materials: You may also find Rainbow Puppy Paw Salt Painting For Kids useful.

- Popsicle sticks (various colors for rainbow effect)
- Paint or markers (for decorating the bus)
- Glue (hot glue or craft glue works best)
- Craft foam or cardstock (for the frame backing and decoration)
- Scissors
- Decorative items (such as glitter, stickers, or embellishments)
- A photo to display in your new frame
Step-by-Step Instructions
Preparing the Frame
Design Your Frame: Decide on the size of your frame based on the photo you’ll be using. Lay out the popsicle sticks in a square or rectangular shape, creating a border while leaving the center open for the photo.
Glue the Frame Together: Use glue to adhere the popsicle sticks to each other. Allow them to dry securely. Make sure the frame is sturdy enough to hold a photo.
Adding the School Bus Decoration
Create a Bus Shape: Use craft foam or cardstock to cut out the shape of a bus. You might find inspiration in other DIY projects, such as creating a fun popsicle stick organizer.
Color the Bus: Paint or color the bus with bright shades. Don’t hesitate to get creative with patterns, adding windows or wheels with markers or stickers.
Assembling Your Frame
Attach the Bus: Once the bus is decorated and the frame has dried, carefully glue the bus shape onto one corner or the top of your frame.
Insert the Photo: Cut your photo to fit the frame’s dimensions. Use glue or double-sided tape to secure the photo in place before sealing the back of the frame with some additional cardstock or foam.
Crafting With Kids
This project is excellent for involving children in the crafting process. They can help paint, decorate, and assemble the frame, making it a fun family activity. As you craft together, consider adding a personal touch, like writing the child’s name or a message on the frame itself.
Tips for Success
Use vivid colors: One of the best parts of creating a rainbow-themed project is using bright, bold colors. If you’re looking for even more colorful ideas, check out crafting a rainbow pencil flower bouquet.
Safety first: When working with scissors and glue, ensure adult supervision for younger crafters to keep the experience safe and enjoyable.
Explore variations: Don’t be afraid to customize the project further. You could change the bus design, add more decorations, or even adjust the frame’s layout.

Frequently Asked Questions
How can I display my finished frame?
You can easily display this frame on a shelf, desk, or hang it on the wall. Depending on the back’s construction, you might also use clips or hooks for hanging.
What if I don’t have popsicle sticks?
Consider using craft sticks, cardboard cutouts, or any sturdy material that can hold the shape.
Can I make this project seasonally themed?
Absolutely! You could adapt this design for different seasons or holidays by changing the colors and decorations. For instance, make a festive ghost glow lantern frame for Halloween or use winter colors for a holiday theme.
Conclusion
Craft your very own Rainbow Puppy Photo Frame with School Bus Design and cherish your memories in a bright, personal way. It’s not just a frame; it’s a creative project that can brighten anyone’s day. If you’re interested in more crafting ideas, you can explore the 80UncleKimby 54Pcs Back to School Bus Picture Frame Crafts Kit or find unique items like a Vintage School Bus Picture Frame on Etsy. Happy crafting!
Print
Rainbow Puppy Photo Frame with School Bus Design
- Total Time: 15 minutes
- Makes: 1 photo frame
Description
Craft a delightful Rainbow Puppy Photo Frame that showcases your favorite memories with a charming school bus design, perfect for kids and families.
Materials
- Popsicle sticks (various colors for rainbow effect)
- Paint or markers (for decorating the bus)
- Glue (hot glue or craft glue)
- Craft foam or cardstock (for the frame backing and decoration)
- Scissors
- Decorative items (such as glitter, stickers, or embellishments)
- A photo to display in your new frame
Instructions
- Design Your Frame: Decide on the size of your frame based on the photo you’ll be using. Lay out the popsicle sticks in a square or rectangular shape, creating a border while leaving the center open for the photo.
- Glue the Frame Together: Use glue to adhere the popsicle sticks to each other. Allow them to dry securely. Make sure the frame is sturdy enough to hold a photo.
- Create a Bus Shape: Use craft foam or cardstock to cut out the shape of a bus.
- Color the Bus: Paint or color the bus with bright shades. Get creative with patterns, adding windows or wheels with markers or stickers.
- Attach the Bus: Once the bus is decorated and the frame has dried, carefully glue the bus shape onto one corner or the top of your frame.
- Insert the Photo: Cut your photo to fit the frame’s dimensions. Use glue or double-sided tape to secure the photo in place before sealing the back of the frame with some additional cardstock or foam.
Notes
This project is great for involving children in the crafting process. Supervise young crafters with scissors and glue to ensure safety.