


Crystal Pipe Cleaner Butterflies
Creating beautiful crystal pipe cleaner butterflies is an engaging and visually stunning craft project that’s perfect for both kids and adults. With a few simple materials, including pipe cleaners and borax, you can make colorful and eye-catching designs that sparkle in the light. This project not only allows for creativity but also provides a satisfying, tangible result that you can display proudly in your home or classroom.
To get started, you will need to gather the necessary materials and familiarize yourself with the steps required to create these lovely butterfly decorations. For those who enjoy crystal and suncatcher crafts, making these butterflies could be a delightful addition to your crafting repertoire. You might also find inspiration in other projects like the rainbow crystal butterfly suncatcher craft.
Materials You’ll Need
Before you begin crafting, ensure you have everything at hand. Here’s what you’ll need:
- Pipe Cleaners: Assorted colors to create your butterfly.
- Borax: This is a crucial ingredient that will help form the crystals.
- Hot Water: You’ll need this to dissolve the borax.
- Jars: To hold the borax solution and suspend your butterflies.
- String: For hanging the butterflies once they’re finished.
- Pencil: To help shape your butterflies.
- Optional Food Coloring: If you’d like to add some vibrant colors to your crystals.
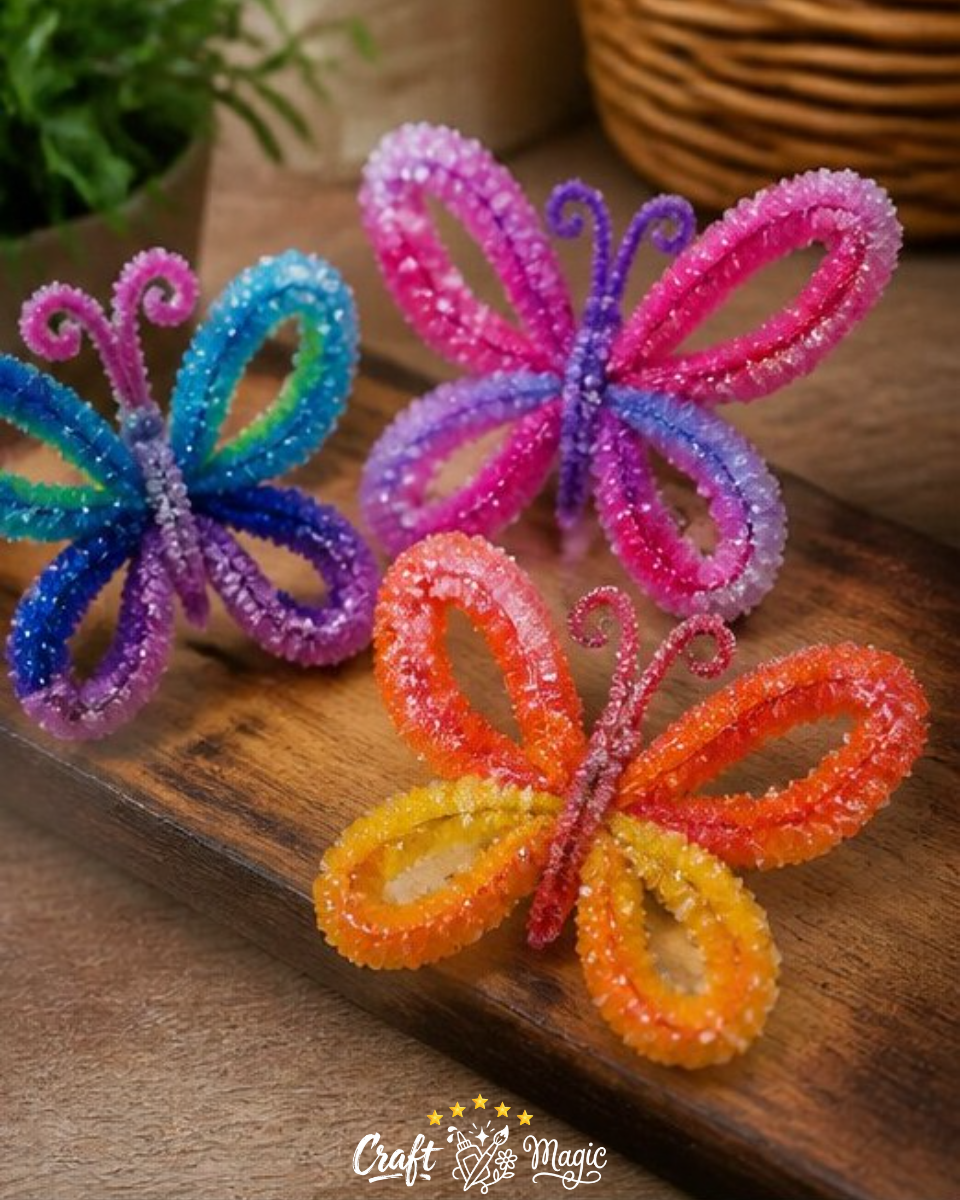
How to Make Crystal Pipe Cleaner Butterflies
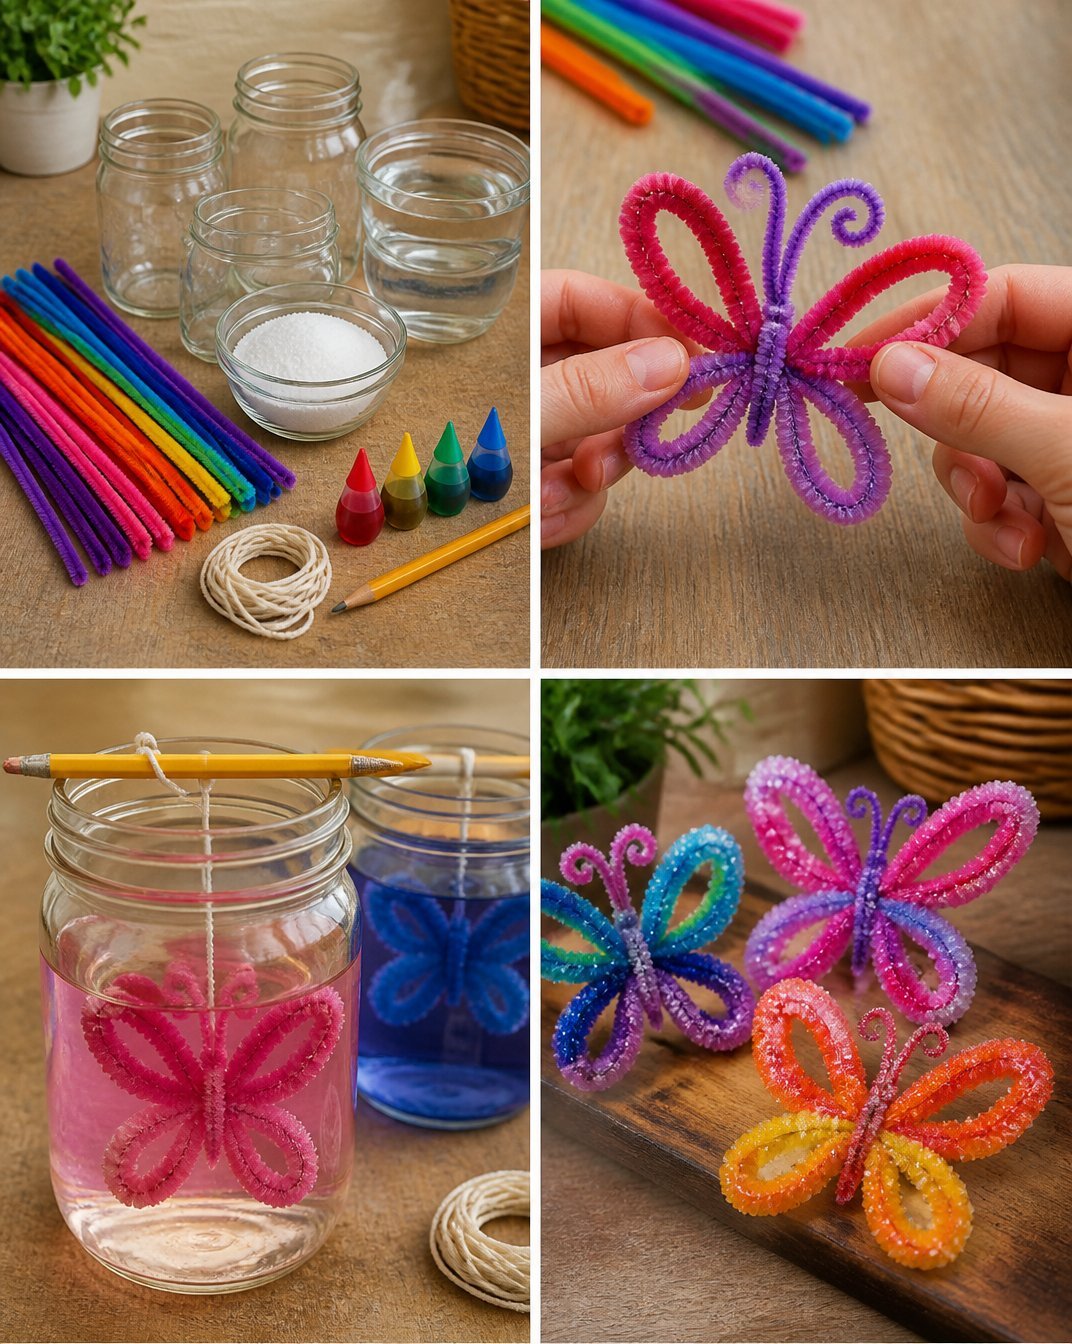
Creating these beautiful butterflies involves several straightforward steps. Follow these to achieve the best results:
Shape Your Butterflies: First, take your pipe cleaners and twist them into lovely butterfly forms. Be creative make them as detailed or simple as you like.
Prepare the Borax Solution: Next, dissolve borax in hot water in your jars. If you want to add a splash of color, mix in food coloring at this stage. The amount of borax needed would typically be about three tablespoons for each cup of water, but ensure it completely dissolves.
Suspend the Butterflies: Then, using a piece of string, suspend your shaped butterflies in the borax solution. Ensure they are not touching the bottom of the jar to allow for even crystal growth.
Let Them Set Overnight: Allow the butterflies to sit in the solution overnight. This is where the magic happens, as the borax crystallizes on the pipe cleaners.
Final Touches: In the morning, carefully remove the butterflies from the solution and let them dry thoroughly. Once dry, display your beautiful creations as desired.
Helpful Tips for Success
Take Care with Hot Water: When preparing the borax solution, be cautious with hot water. It’s best to use a heat-resistant surface and keep children supervised during this step.
Experiment with Colors: The use of food coloring can dramatically influence the final look of your butterflies. Don’t hesitate to try different color combinations!
Display Ideas: Consider hanging your butterflies near a window where they can catch the light, creating a beautiful display of colors when the sunlight hits them.
If you enjoyed this project and want to explore some more creative ideas, check out the rainbow crystal bat clothespin mobile that’s also fun for crafting enthusiasts.
Common Mistakes to Avoid
Incorrect Borax Solution: Make sure the borax is fully dissolved; an excessive amount of undissolved borax can prevent crystals from forming correctly.
Overcrowding the Jars: Avoid putting too many butterflies in one jar, as they need space for the crystals to form without touching each other.
Skipping the Drying Stage: Allow your butterflies to dry completely before displaying them; premature handling can lead to smudges or breakage.
Frequently Asked Questions
How long do the butterflies need to dry?
After removing them from the solution, allow your crystal butterflies to dry completely, which may take a few hours.
Can I use different shapes besides butterflies?
Absolutely! You can create various shapes by twisting pipe cleaners into different forms, expanding your creative options.
What if I want a more textured look?
Experiment with twisting multiple pipe cleaners together or varying the thickness of the pipe cleaners used for added dimension.
Conclusion
Making crystal pipe cleaner butterflies is a delightful craft that brings both fun and creativity to any space. Whether you plan to enhance your home decor or use them as a teaching tool for craft projects, these colorful butterflies are sure to impress. If you’re looking for more inspiration for similar crafts, check out the Crystal Butterfly Craft – Fantastic Fun & Learning for additional tips and ideas. Happy crafting!
Print
Crystal Pipe Cleaner Butterflies
- Total Time: 15 minutes
- Makes: 3-5 butterflies
Description
Create stunning crystal butterflies using pipe cleaners and borax, a perfect craft for all ages.
Materials
- Assorted colored Pipe Cleaners
- Borax
- Hot Water
- Jars for suspension
- String for hanging
- Pencil for shaping
- Optional Food Coloring
Instructions
- Shape your butterflies by twisting pipe cleaners into desired forms.
- Prepare the borax solution by dissolving borax in hot water in jars, adding food coloring if desired.
- Suspend the shaped butterflies in the solution using string, ensuring they aren’t touching the bottom.
- Let them set overnight for optimal crystallization.
- Remove the butterflies from the solution in the morning and allow them to dry thoroughly before displaying.
Notes
Be cautious with hot water and experiment with colors to enhance your butterflies’ appearance.