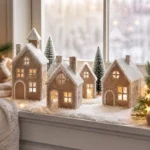
Description
Bring a charming winter wonderland into your home with this DIY Snow Village Window Display, transforming ordinary materials into a whimsical scene.
Materials
- White and blue construction paper
- Scissors
- White glitter
- Clear craft glue
- Cotton balls or faux snow
- LED tea lights
- Miniature houses or figures
- A large piece of cardboard for the base
- Optional: additional decorations like small pine trees or snowflakes
Instructions
- Create your base by cutting cardboard into a rectangular shape for stability.
- Make the snowy background with blue construction paper, cut to fit the back of the cardboard base, and glue it on.
- Add snow by applying clear glue along the bottom of the cardboard, then sprinkle with white glitter.
- Position your miniature houses and figures, leaving space for LED tea lights, and secure them with glue.
- Integrate light by placing LED tea lights among the figures for a warm glow.
- Finish with cotton balls or faux snow to cover glue and enhance the snowy effect.
- Customize your display by adding colorful streamers or decorative pieces.
Notes
This project is great for families; ensure safety with scissors and glue for younger children. Customize it to reflect personal styles and make it unique.